Wednesday, November 4, 2009

Red Lentil and Butternut Squash Soup

red lentil and butternut squash soup

Before I get to the food, let me address this important issue. Where have I been?

Well, I've been very, very busy getting a certificate in Web Design - the first step in a hopeful career change. So I've been crazy in over my head as I learned all about css, page design, flash, using available java scripts, jQuery, a bit about XML, and table-driven and css-driven DHTML.

I haven't cooked much beyond boxed pizza in months. The freezer has been full of frozen meals and I've been thrilled about the invention of the microwave. We didn't have those things when I was a little kid!

But on to the food!

This recipe happened by mistake, as I got punished by my bad karma.

Several weeks ago while out taking
fall pics, I stopped in at one of my favorite foodie destinations, Idylwilde Farms. I saw the soup mixes on the shelves and couldn't resist. You know, the dry soup mixes - the ones with the dried beans in a clear cellophane bag, and then at the top are the herbs and such. You add some stock and veggies. Here's a pic of one of the mixes I got:

soup mix

Well, I bought about four of them because I thought it would be like homemade goodness, but with convenience. Also, they make rather large batches, I could do it in a crock pot and freeze individual meal-sizes that I could just reheat when I felt like it and have comfort food any time.

The first one I made was the beef stew pictured above. And it was delicious. But as I made it I felt like an idiot. I spent so much time sauteing the onions and peeling and cutting up yellow turnip. I thought to myself, "Meryl, what you are doing now is the time consuming part of making anything. You could have made your own stew and made this a blog post and been proud of your creation instead." But it was too late for that.

So a couple of days ago I figured I'd use another of the mixes - this time the Red Lentil and Butternut Squash soup mix. But I got bitten in the rear by bad karma!

So, I was kicking myself as I cut up and seared some chicken, sliced and sauteed the onion, and cubed the butternut squash. But I thought that I must not let this soup mix go to waste. And I was sure it would taste good.

I put all the chicken broth (low sodium) in the crock pot. I added the chicken and veggies, and opened up the top of the cellophane bag of soup mix. The herb packet is always at the top. I reached in, took it out, and I immediately noticed that things were hanging off of it, as if caught on a web.

I was holding it over the sink, puzzled. I thought to myself, "what is this?" as I removed it all from the little plastic herb packet. It was then that I saw the live little worms twitching around inside.

Ewwwwwwwwwwwwwwwww!

And now I've got a dilemma because the soup is already started! I had to do something right away! I remembered that I had some red lentils, so I ran to my laptop to look for my own recipe.


I began by typing in epicurioius.com to find out that my Internet went down. OMG, the Gods are totally against me today! I thought to myself, "Meryl, don't panic. Take a walk with the dogs and the Internet will be back up and running when you return."

So I did. And when I came home, the Internet was back up. I looked at various recipes on various sites and came up with a game plan. Then, I ran to the cupboards to get the lentils. CRAP! I no longer had any.

I decided to let the what was in the crock pot cook, since the chicken was in it, for the rest of the afternoon. Then I put the entire crock in the fridge that evening and went to the store, not knowing if I'd find the red lentils easily or not. Luckily I did find them and I got back to the soup the next day.

In the end, the recipe I chose was a success. Warm, cozy, seasonal, and tasty. I'm glad that I made it and not the mix, although I could have done without the roller coaster ride.

Red Lentil and Butternut Squash Soup
(a crock pot recipe that makes 8-10 servings)

10 cups broth (I use low sodium - by the way, how big is your crock pot?)
a bag of frozen chicken breasts – and olive oil (large bag - approx 8-9 breasts / 3lb?)
a bunch of scallions

olive oil
1 onion sliced
1/2 can light coconut milk *
1 tbs garam masala ** (mine was old)
1 tsp red madras curry
1 tsp cumin
2 cups red lentils (added in last - cooked for about 2-3 hours, tasting for doneness)
salt (I added 1 tsp - I'm very sensitive to salt. I'd suggest 3 tsp for normal people)


* The coconut milk was great. If I were to remake, I'd add the whole can.
** My garam masala was quite old. But even if it were fresh I would still try the entire tablespoon. I bet it would be awesome. But if you are wary of that, you could go with 1.5 teaspoons.

Okay, if I were making this today, all in one day, this is what I would do.

Put the crock pot on high and add the broth, the coconut milk, the cut up butternut squash, and the spices.

Cut up the chicken in to small pieces or slices. Sautee them and them in 1-2 tablespoons of olive oil and add them into the crock pot.

Back in the sautee pan, turn the flame on medium-high, add 1-2 tablespoons of olive oil, heat it up, and add the sliced onions. Sautee them till golden brown and then add them to the crock pot. Leave the crock pot on high for 1/2 hour to an hour. Then turn it to low for a good long time. Geeze, this is where I had it on low for about 6-8 hours and then put it in the fridge overnight.

The lentils don't need as long to cook. Red lentils will take between 1-2 hours to soften on low.

Then you have a delicious, hearty, comforting fall soup. If you put it in the fridge, you'll probably need to add more broth, it gets very thick overnight, and the crock pot can only hold so much liquid.

spoonful


Red Lentil and Butternut Squash Soup

A comforting, hearty, fall soup.

See Red Lentil and Butternut Squash Soup on Key Ingredient.

Thursday, August 27, 2009

Blueberry Pie


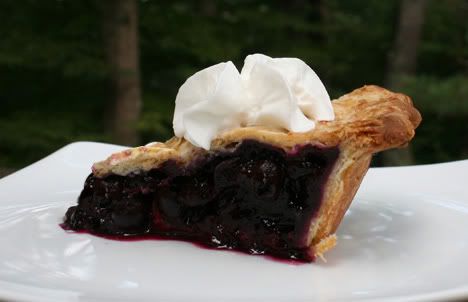
This pie rocks! It was the best blueberry pie I've ever had! I'm super proud to have made it!

That's pretty impressive since I almost never have the opportunity to make a pie. It's been years since I've made a pie, and I've never made a blueberry one. So I'm patting myself on the back and saying "good girl, Meryl."

Why, do you ask, do I never get to make pies? To begin, it's just Joe and I (and the dogs), and we struggle with weight issues. So the last thing we need around here is an entire pie sitting on the counter top. And during all the holidays when people make pies, all the pies are spoken for by other members of the family. The one or two times that I tried to add to the repertoire of pies, my pies were practically untouched, so I gave up. Perhaps I lost my pie-baking confidence as well. So, I just don't make them.

I bought this Longaberger pie plate from my friend Karen about 4 years ago, and up until last Sunday, I hadn't used it yet:


But last Sunday we were invited to a friend's for brunch. She was going to make a peach pie for dessert, and that was very nice of her! But knowing that Joe wouldn't have touched it with a 10-foot pole, I offered to make a blueberry pie (blueberry is Joe's favorite pie).


She accepted, and I thought to myself that I had gotten into a conundrum. I would have to live up to Joe's idea of a blueberry pie, and that idea was his mom's blueberry pie. Oy vey! That's a lot to live up to.

I found a well-liked recipe for a pie on Epicurious.com. Well, the filling was well-liked and the crust was not. Many of the reviewers only suggested to double the cornstarch, so I did. I accidentally omitted the butter when I made my pie, but it wasn't missed.

The crust I used came from my friend Karen. I've posted her recipe as well.

If you are looking for a great blueberry pie, look no further! This is the one.


Blueberry Pie
Filling inspired by a Gourmet Magazine recipe

6 cups blueberries, picked over
1/2 cup cornstarch
1 cup sugar
2 tablespoons fresh lemon juice
1/2 teaspoon freshly grated nutmeg
1/2 teaspoon salt
2 tablespoons half-and-half or milk (optional - to top the crust)
turbinado sugar or large-grain cane sugar (to top the crust)

Karen's No-Fail Flaky Pie Crust


Preheat the oven to 425°F.


In a large bowl toss together the blueberries, the cornstarch, sugar, lemon juice, nutmeg, and the salt. It might be easiest to use your hands so you don't crush all the blueberries. Mound the filling in the shell.

If you use the butter, place little pieces of it around on the top.

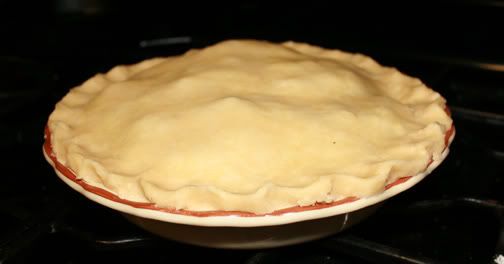
Place the top crust over it and crimp the edges.


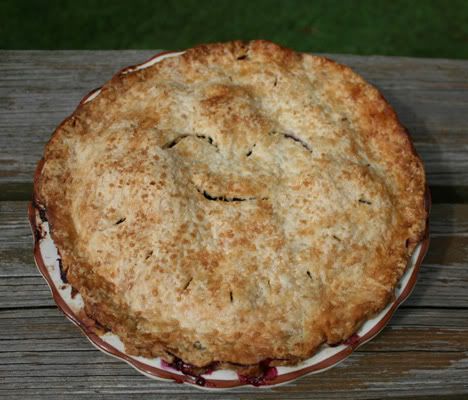
Be sure to use a knife and make air vents in the top crust. I made a smiley face with some outer slashes like short rays of sunshine. Next time I do it, I will remove slivers in the smiley face.

Bake the pie in the bottom third of the oven at 425 for the first 20 minutes. Then reduce the heat to 375 (leaving the pie where it is) and bake for another 25-35 minutes. I baked mine 30 minutes and wish I had taken it out a few minutes sooner. But it was acceptable nonetheless.


Wednesday, August 26, 2009

Karen's No-Fail Flaky Pie Crust

I'm not accustomed to making pies, so when I needed to make one and I found myself visiting my friend Karen, I asked her if she had a no-fail, flaky pie crust recipe. I had a feeling she did, and I was right!

I thank you Karen for this wonderful crust recipe. It was perfect! So easy and simple, that even a pie buffoon like myself could use it and impress her friends.

Karen doesn't even roll out this pie crust. She puts it in the pie pan and spreads it out to fit it with her hands. But in the few times I've made crusts in my life, I've had problems, so I put the chilled dough between sheets of wax paper and rolled them out. It worked like a charm. I only wish I had a little more on the bottom crust. It didn't look too thick, but maybe I could have rolled it out a bit more to have more to play with on the outer edge.


Karen's No-Fail, Flaky Pie Crust
makes a double crust for a 9" pie

2 cups flour
1 1/2 teaspoons sugar
1 teaspoon salt (I used more like 2/3)
1 egg
1 tablespoon vinegar
1/4 cup water
3/4 cup shortening

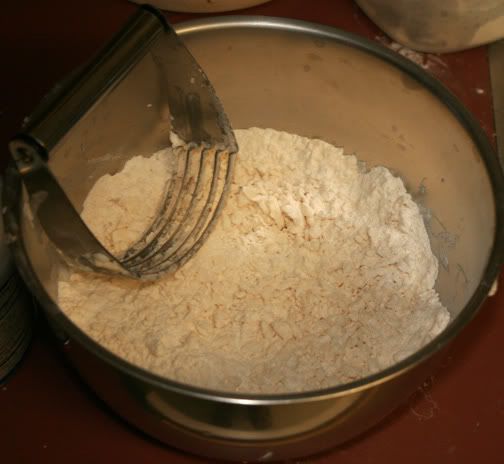
Mix the dry ingredients in a bowl.

Cut in the shortening. I used this tool pictured.

In a separate bowl, beat the egg, vinegar, and water.

Mix in the dry ingredients.

Use your hands to form it all into a ball.

Split the ball in two. One ball should be larger for the bottom crust.

Wrap them in plastic wrap and chill for at least two hours.

When it is time to make the pie, roll out the dough balls between sheets of wax paper.

I learned a little trick to get the dough from the counter to the pie pan when I was watching Sara Moulton the Food Network a long time ago. Fold the dough over in half once, and then again in the other direction. Then place it in the pie pan and unfold. It's much easier than trying to lift the thin sheet of dough.

Karen freezes hers sometimes so she has it ready-made for later.

I used this crust to make my Blueberry Pie.

Tuesday, August 25, 2009

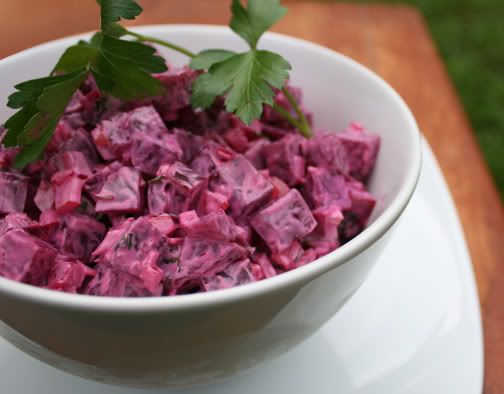
Costa Rican Beet Salad


I love beets. I cannot say the same for my husband, but I can say the same for my friends, Phyllis, Jennifer, and Scott. So I took advantage of spending time with them on Sunday to make some beets.

This Costa Rican Beet Salad is the best I can do to re-live a fond food memory. I studied at the University of Costa Rica in San José for a semester and they served a beet salad that I loved on campus there. That beet salad was near and dear to my heart.

I'm sad that I forgot to save a sprig of the beautiful cilantro for the picture and I had to use a sprig of flat leaf parsley. It was better than nothing. But know, that the cilantro was a wonderful flavor in this dish.

Also, there really are few ingredients. That’s great, because I was originally going to make a salad that had many ingredients and would have cost a bundle. Like many of you, I recently lost my job, so I have to be careful about how much I’m spending.

This salad may have served four, but not if those four wanted large portions. I had more beets because I was originally going to make two different beet salads, but decided to double this one when I realized how little salad I had when I was done.

This recipe will be in the regular recipe rotation around here. It was scrumptious and easy. And who doesn’t like an easy recipe!

Oh, in the picture, I was sad to have to use a sprig of parsley for decoration on the beet salad. I had forgotten to save a sprig of cilantro. Cilantro was an important flavor in the salad. I was gentle with the cilantro - Phyllis liked that it was on the subtle side. But the salad wouldn't be the same without it.


Costa Rican Beet Salad

Inspired by a recipe posted on Recipezaar.com by Cheerleader

4 medium fresh beets
1/4 sweet yellow onion, minced (I used vadalia)
1/3 large yellow pepper, finely diced
2-3 Tablespoons chopped cilantro
4 tablespoons mayonnaise
salt to taste (if you must – truth is, I didn’t)

Prepare the beets and remove the skins.

Dice the beets into small squares

Add minced onion, cilantro, and sweet pepper. This is what I had before I added the mayonnaise:


Add mayonnaise and gently mix thoroughly.

Add the salt if you use it.

Preparing and Cooking Beets - The Boiling Method

Beets are easy to work with and there are several ways to prepare them. In the cold weather it's nice to put them in foil packs with the skins on, baked them, and then removed the skins when done. In the summer, I choose the boiling method.

When choosing your beets at the grocery store, try to get a bunch that has beets of approximately the same size. By doing this, you will have beets that finish cooking at the same time. If they aren’t the same size, be aware that the smaller ones will finish cooking sooner. You will need to remove them earlier so you don’t have beet mush!

Preparing the Beets

Cut off the greens at the base of the beets.

Cut off the tail of the beet.

Leave the skin on the beets! This is very important!

Boil the water first and then place the beets in it. I started out with a 30 minute time limit with the pot covered. Check the beets by piercing them (or attempting to pierce them) with a fork or knife. When the fork or knife easily pierces the beet and goes toward the middle, coming out with no effort, the beets are done!
Beets shouldn't be cooked al dente.

When I checked at the 30 minute mark, I knew that at least another 30 minutes would be necessary. I had chosen large beets at the store.

Thirty minutes later, I set the timer for 10 more minutes. At that point, my two smaller beets were done. I removed them and ran cold water over them while I removed the skins. By the time I was done with that, a few more of the beets were done, and so on and so on.

Important Note About Skin Removal

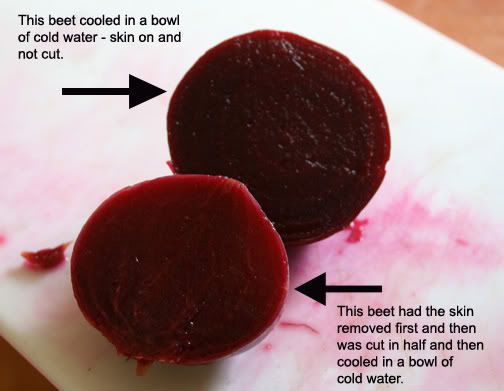
If you want to place the beets in a bowl of cold water before handling them, do it with the skins on!

Case in point – I removed the skins of the first two small beets and then cut them in half and put them in cold water. I forgot to do it with the next beets, and I’m so glad! Look at the difference in the color of the beets I cut in half and then placed in cold water without skin compared to the beets that I place in cold water with the skin on and in tact before removing the skin:


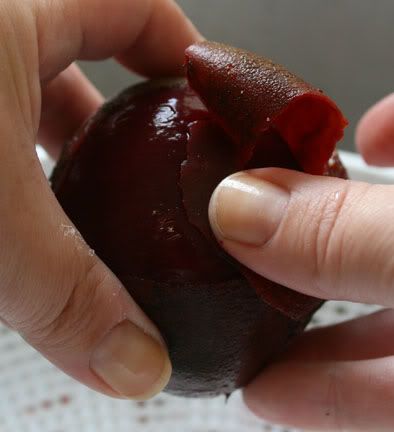
Removing the skin is easy when the beets are cooked. I took the picture below without the water running just so you could see that all it takes is a little pressure with your thumb and pulling away. The skin will go with it. Easy-peasy! Even easier under running water.


Now you are ready for any beet recipe, such as Costa Rican Beet Salad, or to just eat them as they are.